If you are using the system's subscription tools and have a Folder using subscription, you can set up automated e-mail campaigns, a very powerful marketing tool to keep your subscribers engaged. There is an additional cost per email sent from the "Email Campaign Manger" is $0.01 per subscriber, this charge will be billed to the account holder once the email campaign is completed
Email Campaigns are tied to the subscribers for a particular Folder and in order to receive an email, a subscriber must meet these minimum conditions:
- Email has been verified
- Is currently opted-in to receive emails
- subscriber is active status
Follow these steps to set an email campaign for your subscribers.
NOTE: All email campaign messages are chargeable - Contact your account manager for details
Step 1: Turn on the Subscription for a Folder
Once you have a Folder with subscription turned on, and a set of subscribers for that Folder, you can create an email campaign
Step 2: Access the Create Email Campaign Management Tools
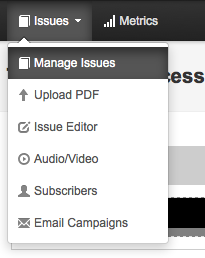
From the Welcome Screen you can click on the "Issues" Drop Down Menu and select "Email Campaigns"

Step 3: Click on New Email Campaign Tab and Create your template
Referring to the below screenshot, complete the form to build your campaign note and set a send schedule.
- Campaign Name: For your reference only. This name will appear in the Schedule and Campaign Reports screen.
- Email Subject: This text will appear as the subject line of the email sent to subscribers
- Reply-To: Set the email address to which subscriber replies will be directed to. Make sure it is an address you have access to.
- HTML Email Body: Create your email template using the CKEditor. The editor supports html as well as regular text so you can build a dynamic and attractive message.
See this article for CKEditor Quick Reference Guide - Auto Tags: Use these tags to automatically display subscriber specific data (eg first/last name) or Folder/Flipbook data. Click on a tag and it will be added to your email body and it will display that custom data. Most of these tags should be self explanatory but %issue_snapshot% will automatically add a predefined element that includes your Folder logo and banner color, a thumbnail of the latest Flipbook , the Folder and Flipbook name, as well as a "read now" link that links to the Folder (to ensure the latest Flipbook is loaded).
- Text Email Body: Some folks are surprisingly still using text only email clients. You should include a message in this box that text only email clients will receive instead of the fully formatted HTML message.
- Send to Subscribers of: Choose the Folder in the dropdown menu that contains the subscribers to whom you want to send the email campaign
- When to Send: Using the drop down menus, choose the date and time you want your email campaign to be sent (must be a date/time in the future)
- How Often? : Choose the interval for the email campaign. You can simply select "Once" for a single non repeating campaign OR you can choose the interval that works for you. As an example, if you know your publication is released every Wednesday morning, you can set a campaign for Wednesday morning, after your publication is expected to be live, that repeats "weekly, based on the above date". Also, don't go overboard with email campaigns, as subscribers may grow tired of your communications if you send too often.
- Test Email on Myself First: The system will open a popup window with a preview of the email, and send a test note to the email address associated with your account
- Campaign Status: Check the "Activate this email campaign" box if you want the campaign to be active and ready to be sent when the schedule dictates. To deactivate a campaign, you can always edit the campaign from the Schedule screen and uncheck this box.
Once you have setup all of the above fields, just click "ADD SCHEDULE" button to finalize the creation of your email campaign.

Comments
0 comments
Please sign in to leave a comment.